Welcome to this guide on setting up ESLZ using Terraform.
I have recently been taking a look at Terraform, and in particular its ESLZ - which I have found to be a lot of fun playing about with. In an effort to maintain for personal use and maybe help others, I have documented the process to go through to get started. I strongly suggest before you start following this guide that you have a subscription already and that its one you don’t care about too much, i.e. a sandpit of sorts. I for this project decided to sign up for a 30 day trial, this will allow you to run everything in a segmented environment safe in the knowledge anything you do is isolated from any production workloads.
What is an Enterprise Scale Landing Zone
The most simple way I can explain ESLZ is in a use case. Imagine you’re a new company, and you’ve asked your IT dept to quickly and effectively setup your Azure environment. You want to ensure that certain policies are met for every subscription you will be creating in the future, for all your business units you want to make sure that they’re all following the same policy like naming , regional restrictions, network configurations, patching configuration, firewall configuration, virtual machine tagging etc. the list goes on. The ESLZ is essentially a zone for all your policies to reside in at the very top level (management), so everything under (subscriptions) get invoked automatically. You can very easily and quickly deploy and make changes to this configuration as and when needed, without having to individually change all your subscriptions. The idea is to also split out your policies, into identity, networking etc so everything keeps its modular state, making updating modules in the future easy.
The best place to start is with this link https://docs.microsoft.com/en-us/azure/cloud-adoption-framework/ready/enterprise-scale/ as if its something you’ve not used before, it can be a bit difficult to wrap your head around.
Connect to Azure
We first need to get you connected to your tenant by performing the below, assuming this is something you have not already done.
- Connect-AzAccount - Straight forward enough, this will pop open a browser window and ask you to login with an account, ensure this has owner permissions.
- Get-AzSubscription - Grabs the list of subscriptions your account above has access to.
- Set-AzContext -Name ABCDE - Sets the subscription you want to work with, suggest you ensure this is set to the one you wish to work with for creating resources.
Create a GitHub repo
Now you will need to create a new repo, for simplicity sake I suggest you navigate to https://github.com/chris-fison/fison-tf-starter.git and clone it, then open from within VSC. I opted to create this repo as it’ll get you up and running a lot quicker and avoid using some of the Terraform documentation which is very assuming of its reader! The repo has some basic files needed, this being terraform.tf variables.tf and main.tf.
Also, take a look at the readme file, I have put some commands I use for this project in there in case you need them at a later date, there’s a few to remember and for me its easier to pick and choose here.
Initialize Terraform and configure
Inside VSC you’ll need to initialize Terraform (from within the location of the repo you cloned), this will go off and download all the relevant azurerm articles etc.
If you have not used Terraform before, then locate the starter guides on terraform.io, its very simple you need to download the latest file and place somewhere, and ensure your PATH is linked to that location so when you run terraform commands, the console knows where to look for the executable.
We need to configure some bits, so open variables.tf and I suggest you add the below and change to another value.
variable "archetype_name" {
type = string
####default = "fisontech"

}
Inside main.tf change the following lines of code to reflect the above.
  custom_landing_zones = {
   #### "${var.root_id}-fisontech-dev" = {
    ####  display_name               = "${upper(var.root_id)} Fisontech Development"
      parent_management_group_id = "${var.root_id}-landing-zones"
      subscription_ids           = []
      archetype_config = {
        archetype_id   = "${(var.archetype_name)}"
        parameters     = {}
        access_control = {}
      }
    }
    ####"${var.root_id}-fisontech-prod" = {
     #### display_name               = "${upper(var.root_id)} Fisontech Production"
      parent_management_group_id = "${var.root_id}-landing-zones"
      subscription_ids           = []
      archetype_config = {
        archetype_id   = "${(var.archetype_name)}"
        parameters     = {
          Deny-Resource-Locations = {
            listOfAllowedLocations = ["eastus",]
          }
          Deny-RSG-Locations = {
            listOfAllowedLocations = ["eastus",]
          }
        }
        access_control = {}
      }
    }
  }

}
You will note the following also has been added to this file, which references the var we created in the variables.tf. I did this as I wanted to play with variables a little and expand on what was already there.
archetype_id = "${(var.archetype_name)}"
Inside the following location, create a file called archetype_definition_fisontech.json
.terraform\modules\enterprise_scale\modules\archetypes\lib\archetype_definitions
You can change the name of the file but make sure it matches the variables we set earlier.
Once you’ve created the file, then copy and paste the following in and save (again change the obvious values):
{
  "fisontech": {
    "policy_assignments": ["Deny-Resource-Locations", "Deny-RSG-Locations"],
    "policy_definitions": [],
    "policy_set_definitions": [],
    "role_definitions": [],
    "archetype_config": {
      "parameters": {
        "Deny-Resource-Locations": {
          "listOfAllowedLocations": [
            "eastus",
            "eastus2",
            "westus",
            "northcentralus",
            "southcentralus"
          ]
        },
        "Deny-RSG-Locations": {
          "listOfAllowedLocations": [
            "eastus",
            "eastus2",
            "westus",
            "northcentralus",
            "southcentralus"
          ]
        }
      },
      "access_control": {}
    }
  }
}
Once done, save everything and sync up your GitHub cloned repo.
Kick off a Terraform plan and apply
Now run terraform plan and terraform apply, the code should then deploy to your selected azure tenant, you should see (eventually something like the following):
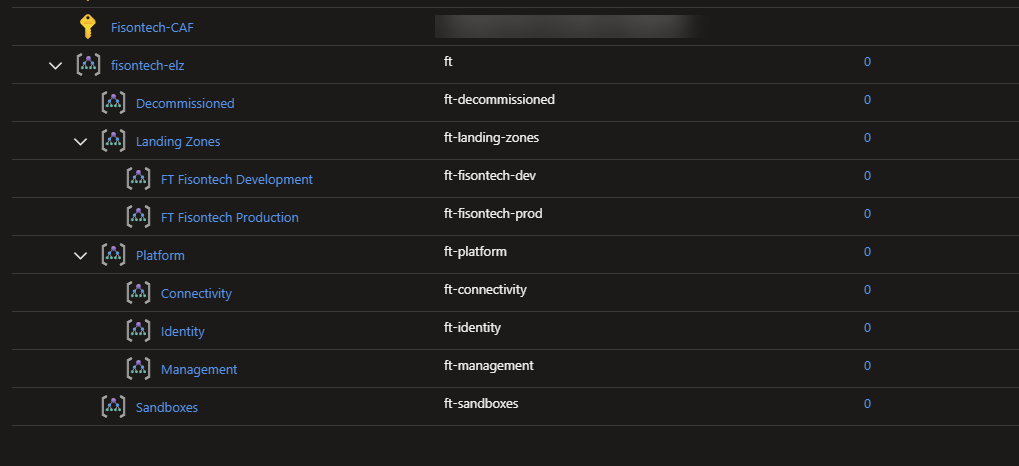
Congratulations, you’ve deployed a ESLZ in the space of 10 minutes or less - that was easy. How long would something like this take in a physical environment?
Move a subscription into our new landing zone
Now you’ve had a look around, you should note that no subscriptions are currently having any policies applied to them.
We can rectify this by running the below commands:
- Get-AzManagementGroup - Get a list of management groups, run this to save you checking the portal.
- New-AzManagementGroupSubscription -GroupId “ft-fisontech-dev” -SubscriptionId “xxx-xxx-xxx-xxx” - Replace with your groupid and subid from previous command.
- Remove-AzManagementGroupSubscription -GroupId “ft-fisontech-dev” -SubscriptionId “xxx-xxx-xxx-xxx” - As above, but this will remove from the management group and back into the tenant root.
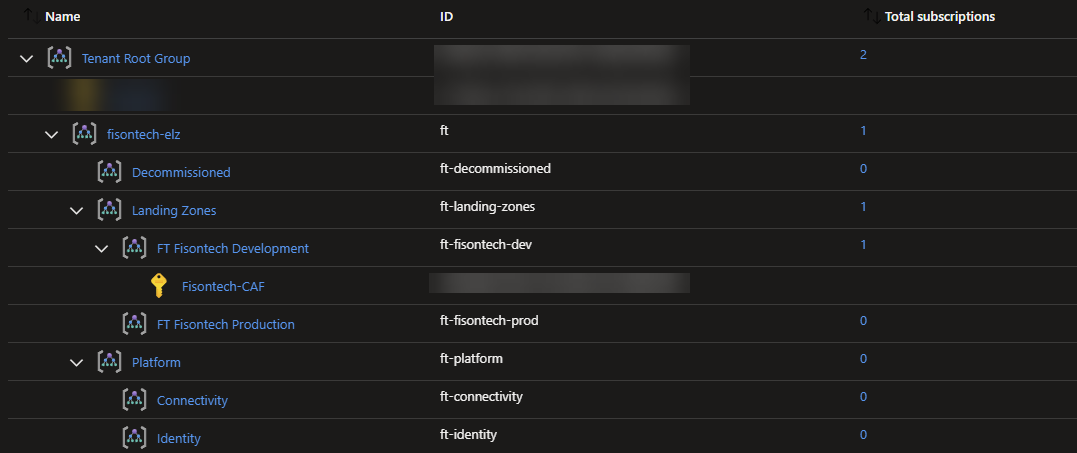
Now we should find all our policies are being picked up, including the custom policy we created.
Confirm our policies are working
Inside VSC, run the following line of code:
New-AzResourceGroup -Name FisonTechUKSouth -Location "UK South"
You will get a policy has denied this creation of the resource, this is because UK South is not on the list of allowed locations:
        "Deny-Resource-Locations": {
          "listOfAllowedLocations": [
            "eastus",
            "eastus2",
            "westus",
            "northcentralus",
            "southcentralus"
          ]
        },
        "Deny-RSG-Locations": {
          "listOfAllowedLocations": [
            "eastus",
            "eastus2",
            "westus",
            "northcentralus",
            "southcentralus"
Amend our configuration to allow a new location
If you amend the JSON, to instead read:
        "Deny-Resource-Locations": {
          "listOfAllowedLocations": [
            "eastus",
            "eastus2",
            "westus",
            "northcentralus",
            "southcentralus"
            "uksouth"
          ]
        },
        "Deny-RSG-Locations": {
          "listOfAllowedLocations": [
            "eastus",
            "eastus2",
            "westus",
            "northcentralus",
            "southcentralus"
            "uksouth"
Save the file, sync with GitHub and then run terraform init, plan and apply this should amend the policies.
Retry creating our resource to see if it works
Now, try running the below again once the changes above have completed.
New-AzResourceGroup -Name "FisonTechUKSouth" -Location "UK South"
You should find the RG gets created without any errors. Now you have shown you’re able to amend a custom policy and push that to your management group and any subscription under it. What this effectively means is, with one line of code and 2 minutes work, you’ve completely changed how x amount of subscriptions can now deploy to UK South. Secondly, if you go into GitHub, you can see within the JSON file changes when/where the code was changed, who committed it and on what date, allowing for an audit trail.
Final notes
I hope this guide helped, personally I had a lot of fun playing with this and am keen to do more.