Welcome to this guide on getting connected to Azure via PowerShell. I have written this down as an easy reference to getting started, covering all the basics from installing PowerShell itself and the relevant Az modules, to connecting into Az itself via the various commands to do this. The idea is to help friends and colleagues with the onboarding process and journey throughout Azure, and I felt this would be a good place to begin.
We will start by downloading the latest version of PowerShell, as without this its a bit difficult to do anything. ;)
Download the latest version of PowerShell
Ensure you’ve downloaded and installed latest PowerShell (in Windows 10 its v5, and note that you cannot remove/change this but you can install other versions). Navigate to the below link and download the latest .MSI installer for PowerShell.
Install the latest version of PowerShell
Once you’ve downloaded the .MSI, run the following commands to Set-Location of the .MSI and run the installer, note I am running this silently but you can remove /quiet if needed.
Set-Location PATH_OF_MSI
msiexec.exe /package XXXXX.msi /quiet ADD_EXPLORER_CONTEXT_MENU_OPENPOWERSHELL=1 ENABLE_PSREMOTING=1 REGISTER_MANIFEST=1
Installing the Azure Module for PowerShell
Ensure you’ve installed the latest AZ module using the following steps.
Step 1. Set the execution policy so you can run scripts from the PS Repo
Set-ExecutionPolicy -ExecutionPolicy RemoteSigned -Scope CurrentUser
Step 2. Install the Az module, this will allow you to use XXXX-AzXXXX commands
Install-Module -Name Az -Scope CurrentUser -Repository PSGallery -Force
If you’ve previously installed the Az module and you’re being asked about clobbering, then you may need to remove old versions as merging/updating (clobbering) can work but normally it ends in disaster so I’d suggest doing this https://docs.microsoft.com/en-us/powershell/azure/uninstall-az-ps?view=azps-6.3.0) which effectively removes the Az modules allowing you to install fresh ones, you might not need to-do this every time but if you’re unsure on versioning then it might be best to start fresh.
Once you’ve installed the module, run the following to display a list of installed modules.
Get-InstalledModule
You can run the following command (admin required) to update all modules if you need. However, depending on the amount of modules, it might be best to select those Az modules that you’re going to use rather than just updating all unnecessarily.
Update-Modules
If you need more information on the Az modules in general, then use https://docs.microsoft.com/en-us/powershell/azure/?view=azps-6.3.0 which covers everything you could possibly need.
Connect to Azure
Connect to Az using the below, this will open a webpage prompting you to login, can also append -TenantId “IDofTenant” to the end to be specific.
Connect-AzAccount
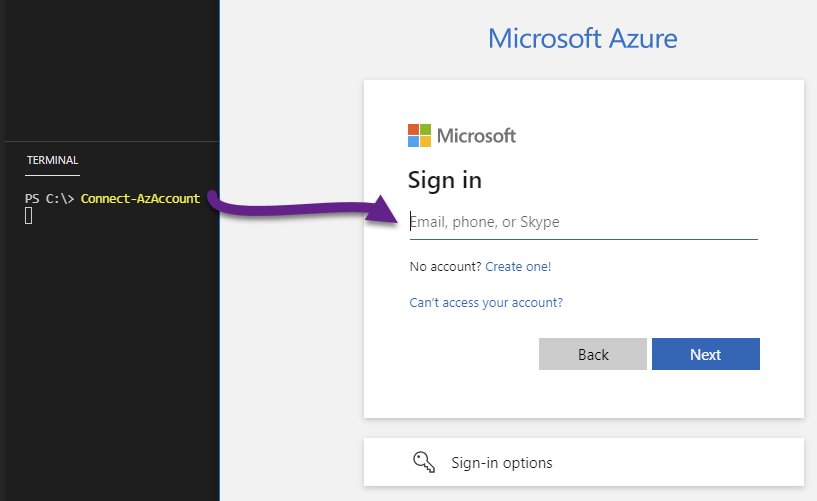
Once you’ve connected, you’ll get the following in your browser window.
Authentication complete. You can return to the application. Feel free to close this browser tab.
You should also have an output detailing the subscription and tenant you’ve connected to for confirmation.
Now you’ll want to ensure if using multiple subscriptions that you’re using the correct one, to do this run the below and this will get the current Azure Subscription that Azure PowerShell is scoped against to execute commands for, if it doesn’t return the correct ID then you need to change it following the below.
Step 1. Get a list of all the Azure Subscriptions your current login has access to.
Get-AzSubscription
Step 2. Set the AzContext to the appropriate TenantId from the list above.
Set-AzContext -TenantId “XXXXXXXX-XXXX-XXXX-XXXX-XXXXXXXXXXXX”
You can also use the following instead.
Set subscription by Id:
Set-AzContext -SubscriptionId “XXXXXXXX-XXXX-XXXX-XXXX-XXXXXXXXXXXX”
Set subscription by Name:
Set-AzContext -SubscriptionName “Company Subscription”
Once you’ve set the context, you can run the following command to confirm.
Get-AzContext
You’re now connected!0
At this point, you’ve done everything you need to start running commands against your Az subscription.
Well done!
If you need more information on Azure PowerShell, use the below link.
https://docs.microsoft.com/en-us/powershell/azure/get-started-azureps?view=azps-6.3.0
Thanks for reading and I hope this guide helps you, please give me a shout if anything needs updating.